Object Oriented Programming in js - JavaScript Basics Part 5
Published May 13, 2019, 9:42 p.m.
Greetings and welcome to part 5 of the JavaScript basics! In this tutorial, we're going to dive into Object Oriented Programming with JavaScript. As time goes on, "scripting" with any programming language can become quite tedious, so some sort of paradigm might be required. JavaScript is a multi-paradigm language, so OOP isn't the only one you must use, but that's the one I am going to cover now.
With object oriented programming, you have objects that you define, and these are sort of "abstract" when you define them. These objects are defined in "classes" (think of this like a class of species...or something, rather than a class where you learn things).
A class will have code where methods and attributes are defined. Methods are actions and things that this object does. Attributes are kind of like descriptions or features of the object.
If you were an object, your attributes might be hair is brown, eyes are blue, height is 9 feet tall, and your methods might be things like eat, sleep, run...etc.
In our case, we want to use OOP because we'd like to have many blobs, but move them individually. Maybe later we'd like to modify their size, and maybe each blob has its own color...and so on. With OOP, we can define a blob object, where size, color, and location are all attributes, then each blob has its own "move" method, and so on. So how might this look? We'll start with some similar code to before:
<html>
    <body>

        <canvas id="myCanvas" width=200px height=137px style="border:1px solid #000000;"></canvas>

        <script>
            const canvas = document.getElementById('myCanvas');
            const context = canvas.getContext('2d');
        </script>
    </body>
</html>
Now, we'll begin building our object.
            class Blob {
                constructor(color, size){ //this is your init
                    this.x = Math.random() * canvas.width
                    this.y = Math.random() * canvas.height
                    this.color = color
                    this.size = size
                    this.xChange = 1;
                    this.yChange = 1;
                }
So we begin to define an object with the class keyword. Then, you see this thing called constructor. This is your initializer/build method that will always run when the class is initialized/constructed.
In this case, we're setting a bunch of attributes for this class. We use the this keyword. This keyword is used to reference variables of the object. In any of the object's methods, we can reference this.x for example. We do not have to define all variables as "this." variables, but, if we want them to be attributes of the object, accessible with the this keyword, then we do. When we define an object of this class, we'll pass the color and size, which will also be passed into this constructor method.
Next, let's define a method besides the constructor. Let's do the movement:
                move(){
                    if(this.x >= canvas.width || this.x <= 0){
                        this.xChange *= -1
                      }

                    if(this.y >= canvas.height || this.y <= 0){
                        this.yChange *= -1
                      }

                    this.x += this.xChange;
                    this.y += this.yChange;
                }
The code here is really the same logically as before, it's just that this time we're using the this to reference the object itself, and here you can see how it works where you can access variables across methods when you've used this.
Next, I am going to make a method that draws the blob.
                draw(){
                    context.beginPath();
                    context.arc(this.x, this.y,this.size, 0, 2*Math.PI);
                    context.fillStyle = this.color;
                    context.fill();
                    context.stroke();
                }
Notice that we're not clearing here. We wouldn't want to clear the canvas per blob, since then we'd only see the very last one!
This is good enough for now in terms of our blob class and methods. We can already work with this blob by doing something like:
            const newBlob = new Blob("green",25)
            newBlob.draw();
            newBlob.move();
            newBlob.draw(); // ...etc.
Full code up to this point:
<html>
    <body>

        <canvas id="myCanvas" width=200px height=137px style="border:1px solid #000000;"></canvas>

        <script>
            const canvas = document.getElementById('myCanvas');
            const context = canvas.getContext('2d');

            class Blob {
                constructor(color, size){ //this is your init
                    this.x = Math.random() * canvas.width
                    this.y = Math.random() * canvas.height
                    this.color = color
                    this.size = size
                    this.xChange = 1;
                    this.yChange = 1;
                }

                move(){
                    if(this.x >= canvas.width || this.x <= 0){
                        this.xChange *= -1
                      }

                    if(this.y >= canvas.height || this.y <= 0){
                        this.yChange *= -1
                      }

                    this.x += this.xChange;
                    this.y += this.yChange;
                }

                //dont wanna clear per blob draw.
                draw(){
                    context.beginPath();
                    context.arc(this.x, this.y,this.size, 0, 2*Math.PI);
                    context.fillStyle = this.color;
                    context.fill();
                    context.stroke();
                }
            }

            const newBlob = new Blob("green",25)
            newBlob.draw();
            newBlob.move();
            newBlob.draw(); // ...etc.

        </script>
    </body>
</html>
The result here should be something like:
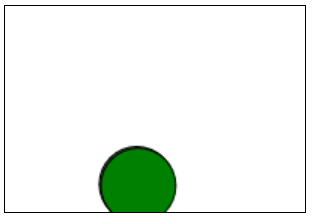
At the moment, you may not really see what the point of this was, as we did this already with functions. The difference will be the ease with which we can add many more blobs, and move them all irrespective of each other, which is what we'll be doing in the next tutorial.
-
Introduction to programming with JavaScript tutorial
-
Functions and more Canvas - JavaScript Basics Part 2
-
Running functions on an Interval with setInterval - JavaScript basics Tutorial Part 3
-
Conditionals - JavaScript basics Tutorial Part 4
-
Object Oriented Programming in js - JavaScript Basics Part 5
(currently viewing) -
Looping with Objects and OOP with JS - JavaScript Basics Part 6